


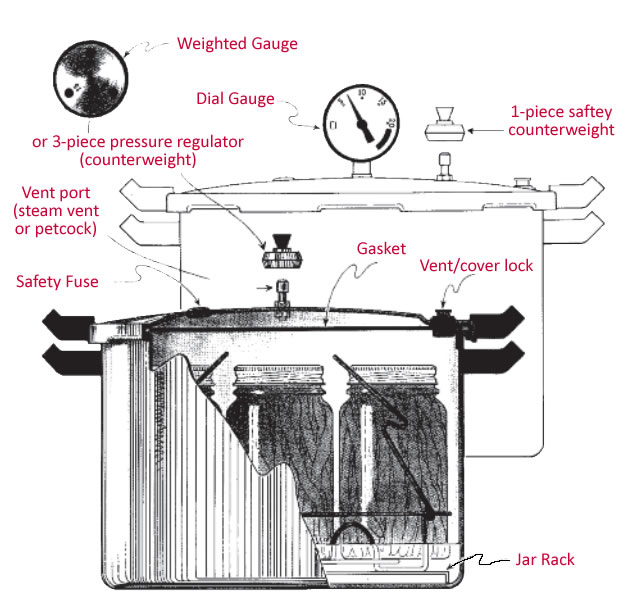
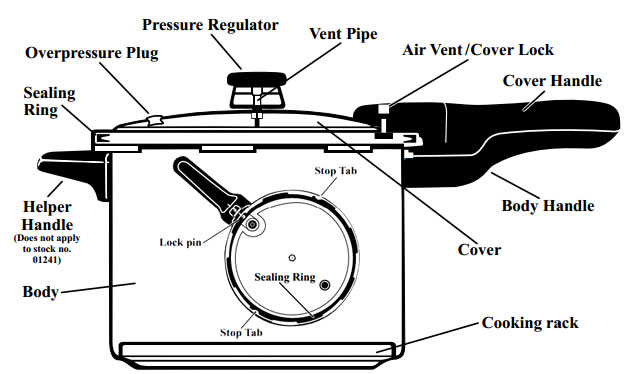


Pressure Canner Parts


Replacing Pressure Cooker/Canner Parts, Frequently Asked Questions
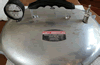
How (and why) do I find my model number? explain Presto's 409a UL stamp.
To guarantee replacement
parts properly fit, they should be ordered according to the cooker
or canner's model number. Model numbers are regularly stamped into
the metal cooker/canner body like under the handle, on the bottom,
or on the cover. If the numbers are too worn and hard to read try
making a pencil scratching over the area on white paper. You will
also be successful if you have the part number from the manufacturer
instruction manual.
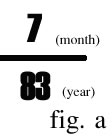
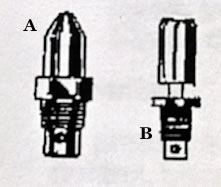
Mirro: The month
and year your cooker was made, if it's stamped into the metal, will
appear as a fraction (see figure a). Not all mirro cooker and canners
have dates stamped onto their body (slightly to the left of the center
on the bottom of the pot). Generally, most model numbers are stamped
right into the middle on the bottom of the pressure pot.
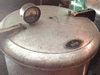
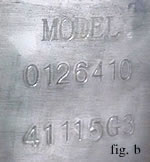
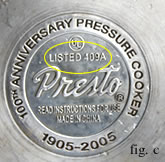
Presto: Some models (the newer, the more likely to)
have their number stamped onto the side of the cooker or canner (see
figure b). It could also be etched into the bottom or just underneath
the handle. Old models will have a label that will be attached to
the top of the cover. Older units have model numbers such as 603,
204, 50, 40, etc.
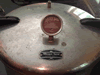
Most Presto cookers and canners will also have a 409a stamped into
the bottom of the pot (in the center). This is not the model number.
409a notes that this Presto pressure canner or cooker was built and
meets the listed Underwriters Laboratory (UL) standards for safe
household pressure cooking and canning (These requirements cover
household-type cooking utensils known as pressure cookers or pressure
sauce pans which operate at a nominal pressure of 15 psi (103 kPa)
or less. They are intended for use over gas- or electric-top burners
of residential type cooking ranges.).
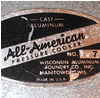
All
American Canners and Cookers: The model number is printed
on the top of the pot. The last two numbers on the bottom of the pot
generally indicate the model too.
All American Sterilizers: The model number on electric units appears above the heat
control knob (fig e).

How do I replace the rubber gasket? How often?
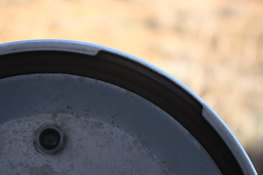
A Rubber Gasket fits into the cover of a pressure canner or cooker to create a secure pressurized seal during cooking. Over time heat exposure can contribute to the sealing ring deformation and shrinkage (and on Presto cookers, the automatic air vent may become hard and deformed). When this happens, replace both the sealing ring and automatic air vent (Mirro and All American do not feature an automatic air vent). Anytime you order any of the Presto sealing rings, you will receive the automatic air vent in the box.
- Sealing rings are manufactured to arrive up to 1" too large to be resilient to normal shrinkage.
- Soaking your gasket in warm water for 10 minutes before installing it can increase pliability.
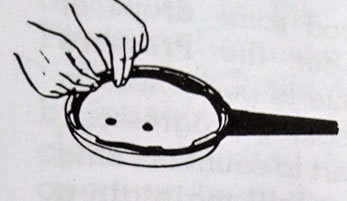
1 Turn Cover upside down and remove the old ring. Scrub the sealing ring groove in the lid thoroughly with a brush to eliminate all foreign matter. Lay the new ring loosely on the inside of the cover and insert a small section into the sealing ring groove.
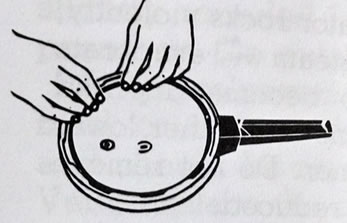
2 As you pick up the next section of ring, push it toward the portion just inserted, while at the same time pressing it firmly into the groove. The sealing ring must be squeezed together section by section as you insert the made slightly oversized ring. Work your fingers all the way around the inside edge of the sealing ring to be sure it is fully in place.
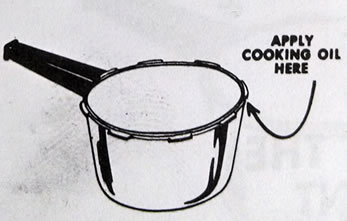
3 When putting the cover on the body, press one hand down on the area opposite the handle to help compress the ring. If necessary, to help make the cover easier to open and close, a very light coating of cooking oil may be applied to the underside of the body lug.
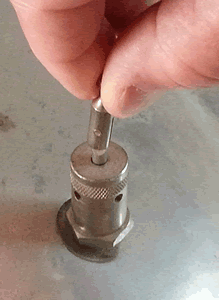
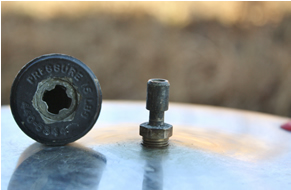
Testing and Replacing your pressure canner gauge.
Pressure Canner gauges should be tested once a year especially when canning at higher altitudes. You can have your gauge tested at a local extension office or at Red Hill General Store's Hillsville, VA Retail location.
Demonstration of gauge being tested.
Replacing your gauge can be easily done using an adjustable wrench.
How do I care for my gasket?
Handle canner and cooker lid gaskets
carefully and clean them according to manufacturer directions. Nicked
or dried gaskets will allow steam leaks during pressurization.
After each use, remove the gasket and wash it in warm, sudsy water.
Rinse, dry, and replace the gasket in the lid. Gaskets on older models
may require a light coating of veggie oil once per year. Gaskets on
newer models come pre-lubricated and do not need oiling.
Caring for pressure vents, weights (and old-time petcocks):
Be sure the petcock, vents and weights are clean. Cool your pressure cooker and canner according to your model instruction manual and the recipe's directions. Take off removable weights (and petcocks for the older models) and wash and dry them by hand.
Is the toggle switch (control value / petcock) on old All American Canner replaceable?
Click here to find the parts that you are going to need to make the exchange and to order an instruction booklet. All American no longer manufactures Canners and Cookers with petcocks.
I have a vintage pressure pot that's missing the lid. Can I get a replacement?
Sorry, most major pressure cooker and canner brands have changed styles many times throughout the last 100 years. They did not keep producing the lids or the kettle bottoms as the models were updated.
Which safety fuse / over pressure plug do I need?
Is measuring a gasket helpful in finding the replacement?
Pressure gaskets differ not only
in diameter but also in thickness and rubber shape. Due to the volume
of gaskets with the same diameter, varying by millimeters we're sorry
we cannot properly fit gaskets from measurements.
To order your replacement gasket, we'll need your model number. or
the actual gasket that needs to be replaced. If you cannot see the
model number, you can mail us your old gasket (or part) to our office
in Virginia.
Pressure Cooker Outlet
1035 Sylvatus Highway
Hillsville, VA 24343
What is the difference between gaskets 3440 and 9882?
This is one example of how difficult
proper gasket selection can be without searching by your pressure
cooker or canner model number. The diameters of 3440 and 9882 are
equal. The 3440 is about a millimeter thicker on the outside and has
a differently shaped inside. Although both gaskets may fit into your
lid, a gasket too small will leak around the sides while a gasket
too big won't allow a lid to close.
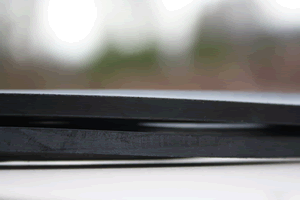
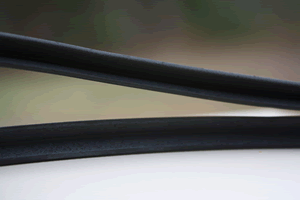
Thickness comparison of sealing rubber gasket 9882 (shown on the top) and rubber sealing ring gasket 3440 (bottom).
If your cooker-specific model number page lists different parts than your model, those parts have likely been updated. Many older Mirro pressure canners and cookers were manufactured using vent tube B. Check out this mirro model number M-035 with the discontinued vent pipe and regulator. For some Mirro models (like the M-0536 pictured below) when replacing the old regulator ( the vent tube must also be replaced and vice versa.

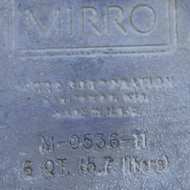
Mirro model M-0536-11 with discontinued regulator and vent pipe (left and center). The model number and liquid capacity are stamped onto the bottom (right)
I live in BC, Canada. Is there a parts distributor in Canada?
We ship to all locations in Canada.
Leakage under the pressure regulator
- There should be a slight leakage under the pressure regulator when cooking is started, do not be alarmed. This is usually due to condensation formed because the temperature of the pressure regulator is lower than the rest of the cooker. This condensation will disappear as the cooking progresses.
- Another possibility is the vent tube is loose, in which case it can be tightened with a crescent wrench. Care should be taken not to not to nick the upper surface of the vent pipe.
- After considerable time, the vent pipe may become worn and should be replaced.
Leakage between the cover and the body
- When first beginning to cook it is normal for moisture to form on the cover and between the handles.
- Leakage between the cover and the body is typically due to shrinkage of the sealing ring after a prolonged period of use. If this condition develops, both the sealing ring and automatic air vent (on presto) should be replaced. Be sure the groove the sealing ring fits into is clean and free of all foreign matter.
- If the leakage persists after a new sealing ring is in place, it may mean the rim body or cover flange has been damaged. In this case, the complete cooker should be serviced.
A slight amount of leakage around
the automatic air vent is a normal operating condition . The automatic
air vent acts as a valve and will completely seal the cooker. Continued
leakage may mean that foreign matter has collected among the edges
of the automatic air vent. This may be corrected by removing and washing
the automatic air vent with hot soapy water.
CAUTION:
Whenever you see excessive leakage from the cooker, remove it from
heat immediately. Reduce pressure completely. Remove pressure regulator
from vent pipe.
All images and text Copyright Red Hill General Store © 1999-2026 All Rights Reserved.
We grant permission to link to any page on www.pressurecooker-outlet.com. Use of this site is subject to certain Terms of Use.
Accessibilty Statement